Continuous Deployment of SQL Server Data Tools (SSDT) Projects, Part 1: Make it repeatable and self-sufficient
I will show you how to set up a continuous deployment process for your SQL Database Projects.
TLDR: I will show you how to set up a continuous deployment process for your SSDT Projects. To make that job easier I made SSDT Continuous Deployment-Enabled project template for Visual Studio 2017-2022 which was also published on Visual Studio Marketplace. I will guide you through the process of importing your database schema into the project template and adapting it for continuous deployment.
SSDT has been doing a perfect job for getting your database schema done right. There is a good toolset for retaining, managing, comparing and deploying your schema. I won't explain the benefits of using SSDT. Find more about SSDT.
But everyone was too shy to ask about how we really do data manipulation before/after a release. SSDT will generate scripts for modifying the schema to its latest definition but very often you have to think several steps ahead when it comes to the adaptation of your existing data. Where does the static reference data (aka Code, Lookup, List, Taxonomy or Reference data) come from? In the end, all that matters is the information in your database and its fitness, not the schema. The schema is just a technicality allowing us to store the data. So maybe a team member will compose and provide a list of scripts that should be executed against the database in a specific order before every release?
Humans make mistakes! And really, I'm too scared of running manual scripts from here and there against production.
You need a repeatable process
DACPAC is the artifact produced which holds the definition of your database. It's the output of an SSDT project.
You shouldn't think much about what you should do when the time for a release comes by. There are a couple of points which can alleviate your anxiety around the time of releasing something to production:
- A build = DACPAC = your database definition.
- Maintain all of your databases by deploying a new DACPAC. No manual changes, if possible!
- A successful release = a successful successive deployment of the dacpac across all your environments :)
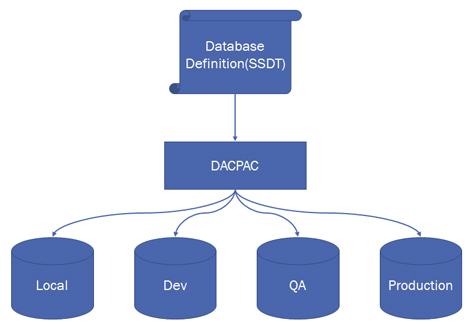
There seems to be a huge chance for a production release to be successful after having successfully integrated it into the Dev and QA environments.
SSDT Continuous Deployment Project Template
This is a Visual Studio 2017 template which comes with some infrastructure to allow your SSDT project to be ready for Continuous Deployment. Install it from Visual Studio Marketplace.
Once you created a project using the template it will look like the following:
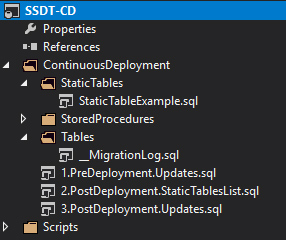
The StaticTables folder holds the files containing MERGE statements that define your static reference data. Those files are listed in 2.PostDeployment.StaticTablesList.sql. Pre/Post-Deployment updates take place in 1.PreDeployment.Updates.sql and 3.PostDeployment.Updates.sql.
The order of execution during deployment follows the diagram:

A demo with AdventureWorks2016
As a prerequisite, you will need to have Visual Studio 2017, SQL Server Management Studio and SQL Server 2016 or higher.
You can find this demo on GitHub.
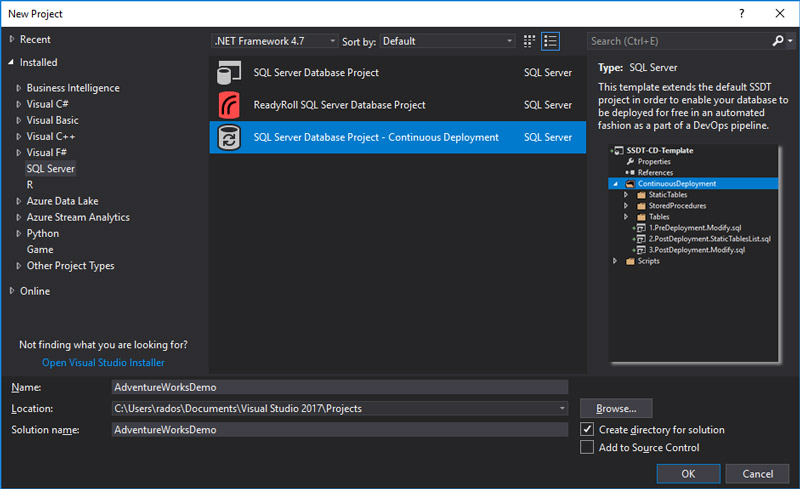
Create a new project.
The project template will appear under the SQL Server type.
Create the schema objects
You will probably be eager to use Import>Database tool but that's only available for empty projects. But if you feel more comfortable with Import>Database you can use it in an empty project and just copy the files.
Anyway, we'll use Schema compare in order to import the schema of AdventureWorks.
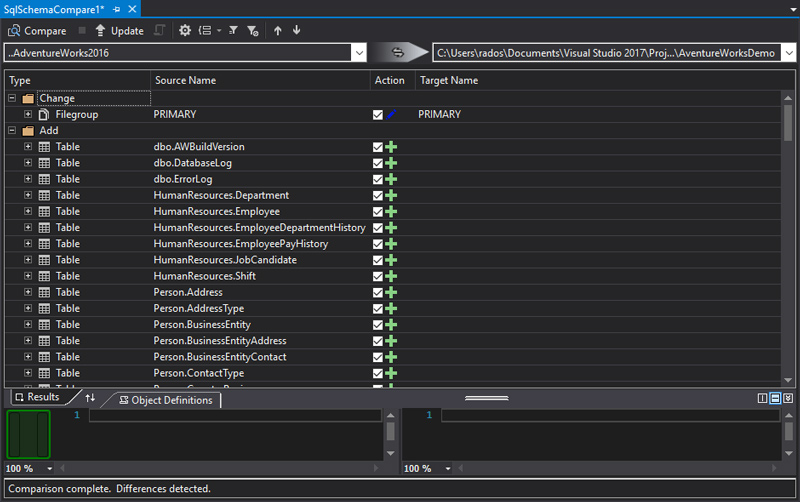
I decided to delete some full-text objects as they were not needed for the demo.
Static data
Now that we have the schema imported, we need to script out the static tables.
But before we are able to do so we have to deploy the database project because we'll use the stored procedure sp_generate_merge.
Execute the following:
EXEC sp_generate_merge @schema = 'Person', @table_name = 'CountryRegion'
EXEC sp_generate_merge @schema = 'Sales', @table_name = 'Currency'
EXEC sp_generate_merge @schema = 'Sales', @table_name = 'CountryRegionCurrency'
EXEC sp_generate_merge @schema = 'Person', @table_name = 'ContactType'
Create a script file of type "Not in build" in StaticTables folder for each of those tables and copy the merge statements.
Then we have to reference those scripts in 2.PostDeployment.StaticTablesList.sql. The order DOES matter so start with the tables sitting at the end of your relationship chain:
:r .\StaticTables\Person.CountryRegion.sql
:r .\StaticTables\Sales.Currency.sql
:r .\StaticTables\Sales.CountryRegionCurrency.sql
:r .\StaticTables\Person.ContactType.sql
Pre/Post-Deployment Updates
All statements in these files will be executed via sp_execute_script which aims to track the execution of a given snippet. It will ensure that a snippet won't be executed twice as long its content stays the same. Note that making a small change to the statement will change the hash of the code snippet so it is always a good practice to implement your scripts in an idempotent and repeatable way.
Note that if you want to implement a Pre-Deployment update you will need to have deployed the project at least once, otherwise sp_execute_script won't exist in the database.
For the sake of the example I added the column IsManager of type BIT to Person.ContactType. It defaults to 0(false). Put the following update in 3.PostDeployment.Updates.sql:
EXEC sp_execute_script @sql = '
UPDATE Person.ContactType
SET IsManager = 1
WHERE Name LIKE ''%manager%''
', @author = 'Radoslav Gatev'
Deployment
I always deploy using Publish. In my opinion Schema compare is good for visualization of the changes but it doesn't seem to include the Pre/Post-Deployment scripts which play a crucial role in our DevOps solution.
Let's review the logs:
SELECT
	[StartTime],
	[EndTime],
	[SqlText],
	[WasSuccessful],
	[Error],
	[Author]
FROM [dbo].[__MigrationLog]
ORDER BY [StartTime]

Check out Part 2: Creating Azure DevOps pipelines!
